Are you planning a trip to India? Before you embark on your Indian adventure, there are some important requirements you need to fulfill. One crucial aspect is obtaining an Indian visa, and this article will guide you through the process for the INDIAN VISA PHOTO REQUIREMENTS and INDIAN VISA DOCUMENT REQUIREMENTS.
To begin, you will need to gather the necessary documents for your visa application.
Additionally, understanding the specific photo specifications is vital to ensure your application is not rejected. You have the option to either get your photo taken professionally or follow the DIY guidelines provided.
Once you have all the documents and photos ready, you can submit your visa application. Don’t forget to pay attention to the processing times and fees.
Finally, you can track the status of your visa application and prepare for your exciting Indian adventure.
Key Takeaways
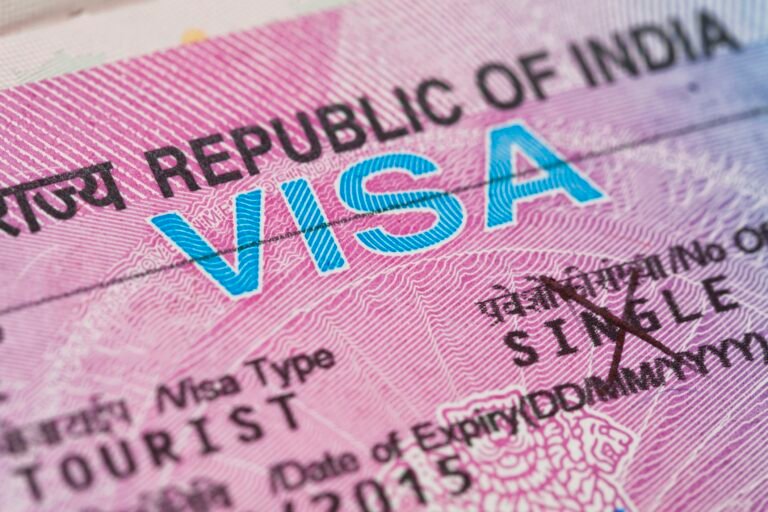
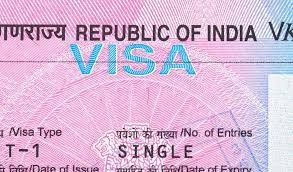
- Valid passport with 6 months validity and 2 blank pages is required for an Indian visa application.
- The photo should be 2×2 inches with the face covering 70-80% of the frame and a white or off-white background.
- Getting a photo professionally taken ensures meeting specifications and avoiding rejection.
- It is important to follow the instructions, submit the application and photos correctly, and pay attention to processing times and fees.
Gather the Required Documents for Your Indian Visa Application
Now that you know the importance of gathering the required documents for your Indian visa application, let’s dive into what you need to make this process smooth and hassle-free!
Understanding visa requirements is crucial to ensure that your application is not rejected. To begin with, you will need a valid passport with at least six months of remaining validity. Make sure your passport has two blank pages for the visa stamp.
Additionally, you must provide two recent color photographs that meet the specific photo specifications for your Indian visa, which we will discuss in the subsequent section.
Apart from the passport and photographs, you will also need to gather other essential documents. First, you must complete the online visa application form accurately and honestly. This includes providing your personal information, travel details, and purpose of the visit. Be cautious to avoid any common application mistakes, such as misspelling your name or providing incorrect information. Double-check all the details before submitting the application.
Furthermore, you need to submit proof of residence, such as a utility bill or a lease agreement, to establish your current address. If you are visiting India for business purposes, you will need to provide an invitation letter from the Indian company or organization you will be working with. For tourist visas, you may need to provide a detailed itinerary of your travel plans within India.
Understanding the specific photo specifications for your Indian visa is vital to ensure your application is not rejected. So, let’s move on to the next section and delve into the details of the photo requirements.
Understand the Specific Photo Specifications for Your Indian Visa
First, make sure you understand the specific photo specifications for your Indian visa. It’s important to follow these requirements to ensure that your visa application is not rejected.
To help you with understanding photo requirements, here are some DIY photo tips:
- Size: The photo should be 2 inches by 2 inches in size, with the face covering about 70-80% of the frame.
- Background: The background should be white or off-white, with no patterns or shadows.
- Expression: You should have a neutral expression with both eyes open and a closed mouth. Avoid smiling or frowning.
- Attire: Wear normal everyday clothes and avoid any clothing that covers your face or head.
By following these photo specifications, you can ensure that your Indian visa application is not rejected due to improper photos.
Now that you understand the photo requirements, you have two options for obtaining the photo: you can either get your photo taken professionally or follow the DIY guidelines. Both options are valid, but it’s important to make sure that the final photo meets all the specifications.
Get Your Photo Taken Professionally or Follow the DIY Guidelines
To ensure a seamless application process, you have two options for your photo: getting it professionally taken or following the DIY guidelines.
Getting your photo professionally taken for your Indian visa application can offer several advantages. Professional photographers are well-versed in the specific photo specifications required by the Indian authorities. They know the proper lighting, background, and composition needed to meet these requirements. Additionally, they have the right equipment and expertise to ensure that your photo is of high quality and meets all necessary criteria. By opting for a professional photo, you can have peace of mind knowing that your application won’t be rejected due to photo-related issues.
If you prefer to take the photo yourself, there are a few tips to keep in mind. First, make sure the photo is taken against a plain white or light-colored background. Avoid using filters or editing the photo in any way that alters your appearance. Ensure that your face is clearly visible without any shadows or obstructions. Maintain a neutral facial expression and keep your eyes open, looking directly at the camera. Lastly, make sure the photo is in color and meets the specific size requirements mentioned for Indian visa applications.
After obtaining your photo, you can proceed to submit your visa application and photos.
Submit Your Visa Application and Photos
Once you have the necessary materials ready, you can proceed to send in your completed application and accompanying photographs. The visa application process is straightforward, but it is important to make sure you follow all the instructions to avoid any delays or rejections. When submitting your application, pay close attention to the photo specifications to ensure your photos meet the required standards.
To help you understand the photo specifications better, here is a table outlining the main requirements:
| Requirement | Description |
|---|---|
| Size | 2×2 inches |
| Background | Plain white or off-white |
| Expression | Neutral face, no smiling |
| Head Position | Centered and directly facing the camera |
| Lighting | Evenly lit with no shadows |
| Attire | Avoid wearing glasses or headwear, unless for religious purposes |
Make sure your photos adhere to these specifications to avoid any issues. It is recommended to get your photos taken by a professional photographer who is familiar with the requirements. However, if you choose to take them yourself, make sure to use a high-resolution camera and follow the guidelines provided by the Indian embassy or consulate.
Once your application and photos are ready, you can submit them through the designated channels, such as the online application portal or by mail. After submitting, it is important to pay attention to processing times and fees to ensure a smooth and timely visa application process.
Now that you have submitted your application and photos, let’s move on to the next step and discuss the importance of paying attention to processing times and fees.
Pay Attention to Processing Times and Fees
When applying for a visa, it’s important to pay attention to the processing times and fees associated with different visa types. Each visa category may have varying processing times, so it’s crucial to plan accordingly and submit your application well in advance.
Additionally, make sure to check the application fees and the accepted payment methods to ensure a smooth and hassle-free process.
Lastly, if you’re in need of expedited processing, explore the available options and any additional fees that may be required.
Different visa types and their processing times
The various visa types have different processing times, allowing you to choose the option that best fits your travel plans. Here are some of the visa types and their processing times:
- Tourist visa: The processing time for a tourist visa is usually around 2-4 business days. This visa allows you to visit India for tourism purposes, such as sightseeing or visiting friends and family.
- Business visa: If you are traveling to India for business purposes, the processing time for a business visa is typically 2-4 business days. This visa allows you to attend meetings, conferences, or explore business opportunities in India.
- Student visa: If you are planning to study in India, the processing time for a student visa is usually around 5-7 business days. This visa allows you to pursue your education in Indian educational institutions.
These are just a few examples of the different visa types and their processing times. Once you have chosen the right visa type for your travel plans, you can proceed with the visa application requirements and process.
Moving on to the next section, let’s talk about the application fees and payment methods.
Application fees and payment methods
Paying for your visa application is a breeze with various convenient payment methods available. To submit your application, you will need to pay the required application fee. The fee varies depending on the type of visa you are applying for.
Currently, the accepted payment methods for Indian visa applications include credit cards, debit cards, and online banking. These options make it easy and hassle-free to complete the payment process.
Once you have made the payment, you can move forward with submitting your application. If you are in a hurry and need your visa processed quickly, there are also expedited processing options available. These options allow you to receive your visa in a shorter time frame.
Expedited processing options
To speed up the process and get your visa faster, you can opt for expedited processing options that allow you to receive your visa in a shorter time frame. Here are the benefits of expedited processing:
- Priority processing: By choosing this option, your application will be prioritized over standard applications, reducing the processing time significantly.
- Rush processing: This option is perfect if you’re in a hurry. It ensures that your visa application is processed with the utmost urgency, allowing you to receive your visa in the shortest possible time.
- Express delivery: With this option, your visa will be shipped to you via a secure and expedited courier service, ensuring quick and reliable delivery to your doorstep.
By selecting one of these expedited processing options, you can expedite the visa application process and receive your visa sooner. Now let’s move on to how you can track the status of your visa application.
Track the Status of Your Visa Application
Check out how you can easily track the status of your Indian visa application and stay updated on the progress. Keeping track of your visa application is crucial to ensure a smooth process and avoid any unnecessary delays. Fortunately, the Indian government provides a convenient online platform where you can track your application status effortlessly.
To track the status of your Indian visa application, simply visit the official website of the Indian Visa Online Services and navigate to the ‘Visa Application Status’ page. There, you will be prompted to enter your Application ID and your passport number. Once you submit this information, you will be able to view the current status of your application, including whether it is still under review, approved, or if any additional documents are required.
To give you a visual representation of the process, here is a table outlining the possible statuses and their meanings:
| Status | Meaning |
|---|---|
| Under Review | Your application is being processed |
| Approved | Your visa has been approved and will be issued soon |
| Additional Documents Required | Further documents are needed for processing |
| Rejected | Unfortunately, your visa application has been denied |
It is important to note that visa application delays can occur due to various reasons, such as incomplete documentation or security checks. By tracking your application status regularly, you can address any issues promptly and ensure a smooth process.
Now that you know how to track your visa application, let’s move on to the next section where we will help you prepare for your Indian adventure.
Prepare for Your Indian Adventure
When preparing for your Indian adventure, there are a few key points to keep in mind.
First, make sure to book your flights and accommodations in advance to secure the best deals and ensure a smooth journey.
Next, take the time to research local customs and culture so that you can fully immerse yourself in the experience and avoid any cultural faux pas.
Lastly, don’t forget to pack essentials for your trip to India, such as comfortable clothing, sunscreen, insect repellent, and any necessary medications.
Booking your flights and accommodations
When booking your flights and accommodations, it is important to consider a few factors. First, make sure that your choices meet the specific requirements for your Indian visa photo and documents. This will ensure a smooth visa application process.
When it comes to booking flights, take into account the duration and layovers that best suit your travel preferences. Look for options that align with your schedule and provide the level of comfort you desire.
For accommodations, prioritize convenience, safety, and budget. Look for places that are conveniently located, ensuring easy access to the attractions and amenities you plan to visit. Safety should also be a top priority, so research the area and read reviews from previous guests. Lastly, consider your budget and find accommodations that fit within your financial means.
During the booking process, pay attention to any specific requirements for your Indian visa. This may include providing a photocopy of your passport or a recent photo with specific dimensions. Make sure you have all the necessary documents ready to avoid any complications.
To make informed choices, research online platforms for flight and hotel bookings. Compare prices, read reviews, and consider the amenities offered by each accommodation. Check if the hotel provides Wi-Fi or breakfast, as these can greatly enhance your stay.
As you finalize your travel plans, it is also a good idea to start researching local customs and culture. This will help you make the most of your Indian adventure and ensure that you have a memorable and enjoyable trip.
Researching local customs and culture
Immerse yourself in the vibrant local customs and culture of India to fully embrace the rich experiences that await you on your adventure. India is a country deeply rooted in its traditions, and by understanding and respecting these local customs, you can truly connect with the people and their way of life.
Take the time to learn about the etiquette and manners practiced in different regions, as they may vary. This will help you navigate social situations with ease and show your respect for the local culture.
Additionally, familiarize yourself with basic language and communication skills, as this will make your interactions with locals more meaningful.
As you delve into the fascinating world of Indian customs, you’ll be well-prepared to pack your essentials for this incredible journey ahead.
Packing essentials for your trip to India
Now that you’ve researched local customs and culture, it’s time to start packing essentials for your trip to India. Remember, it’s important to pack wisely and efficiently to ensure a smooth and enjoyable journey.
Start by organizing your travel itinerary and considering the duration of your stay. Make sure to pack comfortable clothing suitable for the climate, as India can have varying weather conditions. Don’t forget to include appropriate footwear for exploring the vibrant streets and historical sites.
Other essentials to consider include a travel adapter, toiletries, and any necessary medications. Additionally, it’s wise to bring a copy of your passport, travel insurance documents, and a first aid kit.
By being well-prepared with these packing essentials, you’ll be ready to embark on your Indian adventure with peace of mind.
Frequently Asked Questions
What are the consequences if my Indian visa application is submitted without the required documents?
If you submit an incomplete Indian visa application, consequences may include delays, rejection, or even denial of your visa. Make sure to provide all required documents to avoid any complications in the application process.
Can I use a photo from my previous visa application for my new Indian visa?
Yes, you can use the photo from your previous visa application for your new Indian visa. However, be aware of the consequences if your visa application is submitted without the required documents.
Is it mandatory to get my photo taken professionally, or can I take it myself?
You can take your own photo for your Indian visa application instead of going to a professional photo studio. However, make sure to follow the specific guidelines provided to ensure your photo meets the requirements.
Can I pay the visa fees in a currency other than Indian Rupees?
Yes, you can pay the visa fees in a currency other than Indian rupees. There are alternative payment methods available, but keep in mind exchange rate considerations when making the payment.
How long does it usually take to receive a response on the status of my visa application?
Usually, you’ll receive a response on the status of your visa application within a few weeks. Visa processing time may vary, so make sure to regularly check for visa application status updates.
Conclusion
Indian visa photo and document requirements:
- Gather all the necessary documents.
- Follow the photo specifications.
- Submit your visa application.
Make sure to keep track of the status of your application and be prepared for your Indian adventure!
Remember, paying attention to processing times and fees is crucial, so don’t forget to stay updated.
Good luck and enjoy your time in India!